Brioche Bread Recipe: The Ultimate Guide to Rich, Buttery French Bread at Home
Introduction
There are few breads as tempting as authentic brioche bread, rich, golden, and incredibly soft. With its famous buttery aroma, light crumb, and glossy crust, brioche brings together everything bakers love about French baking. Whether enjoyed for breakfast, turned into luxurious brioche French toast, or used as the base for gourmet sandwiches and desserts, this bread stands apart for its decadence and versatility.
Homemade brioche bread is superior to store-bought loaves because you control the quality of every ingredient—real butter, fresh eggs, and genuine technique. At Tedco Global Chefs Academy, we celebrate professional and artisan breads, empowering home bakers to master baking like a true French boulanger. This in-depth blog covers everything: the heritage of brioche, tips on the softest crumb, step-by-step methods, creative variations, and chef secrets for perfect results every time.
Ready to discover the secrets of an unforgettable brioche bread recipe? Tie on your apron, check your ingredients, and let’s begin your journey into one of the world’s greatest breads.
Pro Tip: Perfect your soft, moist blueberry muffins by enrolling in a bakery chef course, master batter aeration, oven spring, and crumb control for true bakery-style domes.
1. What is Brioche Bread?
French Origins & Heritage
Brioche bread originates from France and is one of the country’s most celebrated enriched breads. With records dating back to the 15th century, it began as festive bread during religious and holiday occasions, symbolizing prosperity thanks to its luxurious proportions of butter and eggs. Over time, brioche became a staple in French bakeries and homes, expanding far beyond its roots.
Why Brioche Stands Out
Brioche is not just another white loaf. What sets it apart?
High Egg and Butter Content: Gives an ultra-soft, tender crumb and that signature “melt-in-your-mouth” texture.
Delicate Sweetness: Subtle sugar notes make it delicious even with minimal add-ins.
Golden Crust: Egg wash provides the iconic rich color and shine.
Versatility: Serves as breakfast bread, sandwich base, component for French toast, and even dessert.
Where many breads are rustic, brioche is refined—a product of skill, patience, and excellent ingredients. No wonder it is a favorite at bakeries and on festive tables around the world.
2. Essential Ingredients for Authentic Brioche
Classic brioche bread has a unique structure and taste, thanks to its ingredients:
The Key Players
Bread Flour: Higher protein for proper gluten development, needed to support the butter and eggs.
Fresh Eggs: Contribute both richness and structure.
Unsalted Butter: Room-temperature, high-quality butter (European style or French butter is best) for maximum flavor and mouthfeel.
Whole Milk: Adds tenderness and helps make the dough manageable.
Yeast: Both active dry and instant yeast work; use fresh yeast for best taste.
Sugar: Only a modest amount, providing sweetness and helping with browning.
Salt: Balances flavors and enhances the bread’s profile.
Enrichment Options
Vanilla Essence: For a subtle sweet aroma.
Orange or Lemon Zest: Special occasions and festive breads.
Chocolate Chips or Swirled Fillings: For creative variations.
Why Quality Matters
Use of eggs and butter in large quantities means their taste comes through strongly. The better your butter and eggs, the more your brioche will taste like bakery-quality French bread.
Basic Brioche Ingredients List
Ingredient
Quantity
Notes
Bread flour
3½ cups (420g)
All-purpose works if needed
Instant yeast
2¼ tsp (7g)
Or active dry yeast
Sugar
¼ cup (50g)
Adjust for sweeter bread
Salt
1 tsp (6g)
Eggs
4 large
Room temperature
Whole milk
½ cup (120ml)
Lukewarm
Unsalted butter
½ cup (115g)
Room temperature, cut in cubes
Optional flavors
As per taste
Vanilla, zest, etc.
3. Equipment Checklist
Making perfect brioche requires the right equipment, especially for kneading the sticky dough.
Stand Mixer with Dough Hook: Essential for kneading, as brioche dough is too sticky and rich for reliable hand-kneading.
Mixing Bowls: For various stages—mixing, rising, proofing.
Loaf Pan(s): Standard (9x5 inch), but you can also use round pans or molds for buns and braided shapes.
Pastry Brush: For applying the egg wash.
Measuring Cups and Spoons/Kitchen Scale: For ingredient accuracy.
Bench Scraper or Spatula: To handle sticky dough.
Plastic Wrap or Clean Cloth: For covering dough during proofing.
Cooling Rack: Prevents soggy sides after baking.
Investing in a kitchen scale and stand mixer makes a huge difference in both ease and result. If baking regularly, these tools are worth it.
4. Step-by-Step Recipe: Making Brioche Dough
Step 1: Activate the Yeast
Warm the milk (not hot; about 37°C/98°F).
Whisk in sugar and sprinkle yeast over the milk.
Let sit for 5–10 minutes until foamy. This confirms the yeast is active.
Step 2: Mix Dry and Wet Ingredients
In the stand mixer bowl, combine bread flour and salt.
Add the yeast mixture, eggs, and sugar.
Using the dough hook, mix on low speed until a shaggy dough forms.
Step 3: Knead and Incorporate Butter
Increase mixer speed to medium.
Gradually add room-temperature butter, one cube at a time, waiting for each to mix in before adding the next.
Scrape down bowl sides as needed.
Continue kneading for 8–12 minutes until dough pulls away from sides and is smooth, glossy, and slightly sticky.
Why slow butter incorporation?
Adding butter little by little allows gluten strands to develop and prevents greasy, separated dough. It’s key for the classic brioche texture.
5. Kneading and First Proof
Kneading Sticky Dough
Stand mixer method: Continue 8–12 minutes until dough is silky, elastic, and only slightly tacky.
Windowpane Test: Stretch a dough piece gently between fingers. If you can stretch it thin without tearing (like a windowpane), gluten is developed.
First Proof
Transfer dough to a greased bowl.
Cover with plastic wrap or a damp towel.
Let rise at room temperature for 60–90 minutes, until doubled in size.
If your kitchen is cool, let dough proof longer, but avoid over-proofing, which weakens structure.
6. Chilling and Shaping the Dough
Chilling (Optional but Recommended)
Punch down dough after the first rise.
Cover and chill dough for at least 2–4 hours, or overnight (8–12 hours).
Chilled dough is easier to shape and handles stickiness better, plus it develops deeper flavor.
Shaping Options
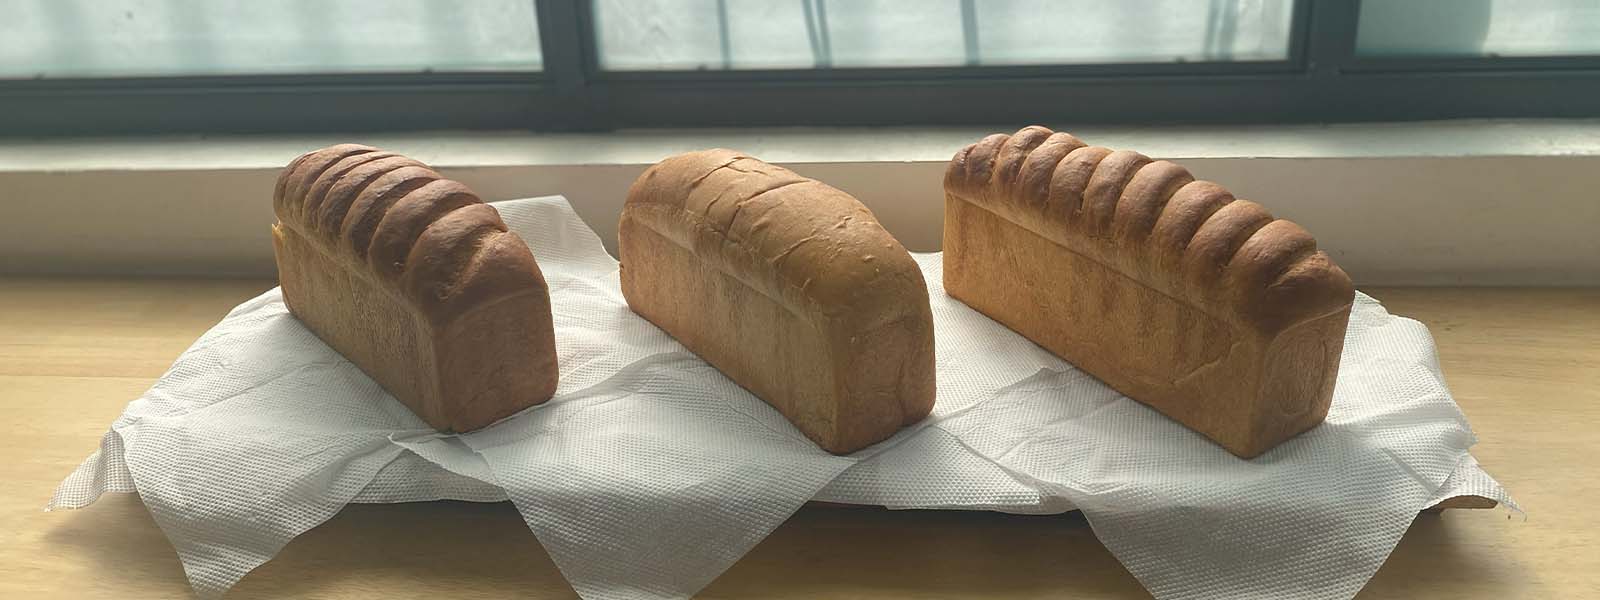
Classic Loaf: Gently roll into a log and place into a greased loaf pan.
Braided Brioche: Divide dough into three ropes, braid loosely, and tuck ends under before placing in the pan.
Brioche Rolls: Shape dough into small balls for individual portions.
Each shaping method creates a different look but follows the same baking technique.
7. Second Proof
Place shaped dough into prepared loaf pan or onto a lined baking tray.
Cover with a towel or lightly greased plastic wrap.
Let rise 60–90 minutes, or until dough is puffy and has nearly doubled.
Identifying Proper Proof
Press a finger gently into the dough (indent test). If the indent springs back very slowly and partially fills in, it’s ready to bake. If it springs back fast, wait a bit longer.
8. Baking Brioche to Golden Perfection
Preheat Oven: 180–190°C (350–375°F).
Egg Wash: Beat one egg with 1 tablespoon milk. Brush gently over the top of the dough for a shiny, golden finish.
Bake:
Loaf: 30–40 minutes.
Rolls or smaller loaves: 18–25 minutes.
Doneness:
Bread should sound hollow when tapped.
Interior temperature should be 88–90°C (190–194°F).
Crust should be deeply golden.
If the top browns too quickly, tent lightly with foil in the last 10 minutes.
Pro Tip: Transform home bakes into bakery-style muffins with a comprehensive culinary arts course, covering mixing methods, leavening balance, and moisture retention for ultra-soft muffins.
9. Cooling and Storing
Cooling
Remove the brioche from the oven and cool in the pan for 10 minutes.
Gently unmold and let the bread cool fully on a wire rack.
Never slice hot, brioche is very soft and needs time to set, or it may squash and become gummy.
Storing
Short Term: Store at room temperature in an airtight container or bread bag for up to 3 days.
Freezing: Slice and wrap tightly; freeze up to 2 months. Thaw at room temp, toast, or rewarm for fresh-baked softness.
Brioche stales faster than lean breads due to butter content, but gentle reheating restores its pillowy crumb.
10. Serving Ideas & Creative Variations
Classic Ways to Serve
Fresh, Plain: Enjoy slices with jam, honey, or butter.
French Toast: Dip in egg-milk mixture, pan-fry, and enjoy with maple syrup, brioche bread. French toast is world-famous.
Bread Pudding: Use leftover slices for a rich, custardy dessert.
Sandwiches: Make gourmet sandwiches, burgers, or sliders.
Delicious Variations
Chocolate Chip Brioche: Fold chocolate chips into dough after first rise.
Swirled Fillings: Roll out dough and spread with Nutella, cinnamon sugar, or fruit jam before braiding.
Savory Brioche: Add chopped herbs, grated cheese, or spices for a dinner bread.
Using Leftovers
Stale brioche transforms into:
Croutons
Bread pudding
Luxury grilled sandwiches
Never waste a crumb of this precious bread.
11. Troubleshooting & Pro Tips
Common Brioche Issues
Dense Texture: Cause: Under-kneading, over-proofing, or butter added too quickly. Fix: Be patient during kneading and proofing, add butter slowly.
Flat Loaf: Cause: Weak dough or over-proofing. Fix: Watch proofing carefully and use bread flour.
Uneven Browning: Cause: Egg wash applied inaccurately or oven hot spots. Fix: Brush evenly, rotate pan midway if needed.
Tedco Chef Tips
Use the best flour, pure butter, and fresh eggs for true French flavor.
Chilling dough overnight firms up butter, giving better layering and flavor.
Avoid over-handling after the second proof—gentle is best.
Double the recipe to make two loaves; share one or freeze for later.
For extra-shiny crust, brush with egg wash twice: Once before proof and once before baking.
Adapting for Home Bakers
If you don’t have a stand mixer, knead by hand with oiled hands and bench scraper—prepare for a workout!
To scale up, use baker’s percentages (flour at 100%, calculate all other ingredients as a percent of flour weight).
Try adding a touch of honey or swapping some milk for cream for richer flavor.
Conclusion
Homemade brioche bread brings a piece of the French bakery into your kitchen—rich, tender, and impossibly soft. Families love waking up to the warm smell of brioche, slicing it for breakfast, transforming it into French toast, or baking luxurious bread puddings.
Experiment with sweet or savory flavors, try different shapes, and enjoy your masterpiece fresh or reinvented as a gourmet treat. If you share your results, don’t forget to tag Tedco—we love seeing baking journeys come alive.